
A motion sensor-controlled lamp is a simple and useful project that teaches you how to work with sensors and microcontrollers. It’s great for automatically turning on a light when someone enters a room, cupboard, or hallway.
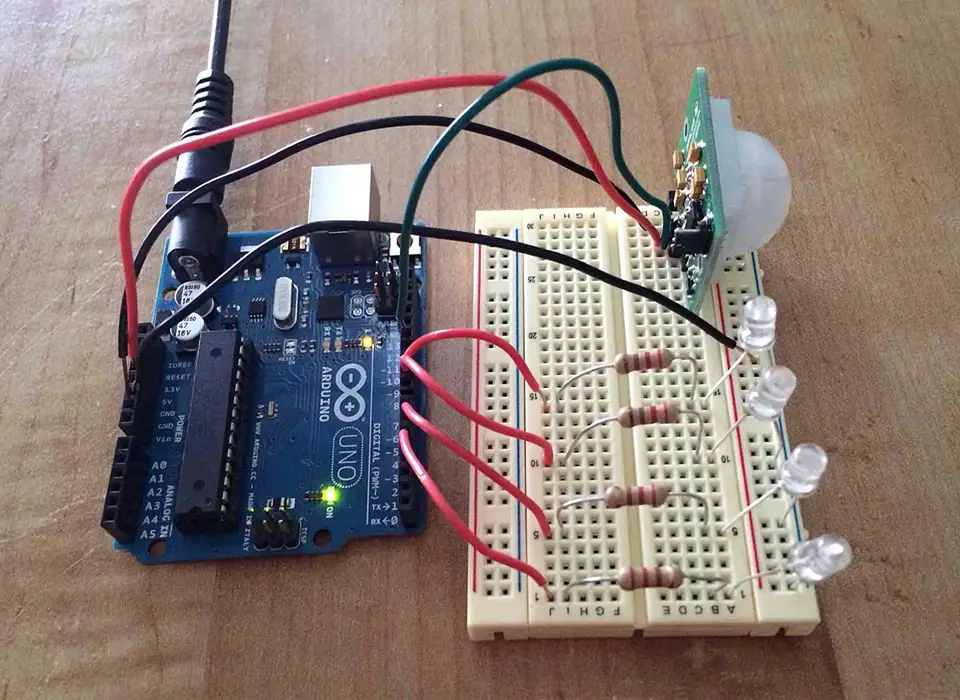
Components
What you need:
- Microcontroller (Arduino Uno or Nano)
- PIR Motion Sensor (HC-SR501)
- LEDs (as many as you’d like)
- 220Ω Resistor
- Jumper Wires
- Breadboard
- Power Source (USB or battery)
- 3D printer (optional, for enclosure)
- CAD Skills (optional, for designing the case)
Steps to follow when making your first motion-sensor lamp
- Sketch the setup
Draw out the simple circuit:- The PIR sensor detects motion
- The Arduino turns on the LED
- This helps plan where each component will be placed on the breadboard.
- Connect the PIR sensor to the Arduino
- VCC → 5V
- GND → GND
- OUT → Digital Pin (e.g. D2)
- Place the sensor where it has a clear field of view. You can adjust its sensitivity and delay using the two onboard knobs.
- Connect the LEDs to the Arduino

Sensor Controlled LED
- One end of the 220Ω resistor connects to Digital Pin (e.g. D3)
- The other end of the resistor connects to the positive leg of the LED
- The negative leg of the LED goes to GND
- Each LED has their own resistor and digital pin.
- The resistors limit the current to the LED and prevents them from burning out
- Write the code
Use ChatGPT to generate Arduino code that:
-
- Reads the signal from the PIR sensor
- Turns the LED on when motion is detected
- Turns it off after a short delay
You can test the code and circuit using the Arduino IDE and a physical breadboard, or simulate it in TinkerCAD.
You can customise the code however you’d like.
Guidelines / Tips to making your Motion Sensor Lamp
- Place your PIR sensor properly
- PIR sensors detect infrared radiation (body heat) best when the motion is across their field of view, not directly towards or away from them.
- Adjust sensitivity and timing
- Use the onboard potentiometers to fine-tune how sensitive the sensor is and how long the output stays HIGH after detecting motion.
- Use a diffuser or lampshade
- Add a piece of frosted plastic or paper over the LED to make it look more like a soft ambient light source.
- Test with different lighting conditions
- Some PIR sensors are affected by strong ambient light or heat sources. Try testing in both bright and dim areas.
How to develop your project
- Add a low-light condition
- Use an LDR (light-dependent resistor) so the LED only turns on when it’s both dark and motion is detected.
- Add a second LED
- Use different LEDs for different purposes — one as a status light (e.g. motion detected), and one for illumination.
- Turn it into a nightlight
- Combine with a small 3D printed case or lampshade to make a functional motion-activated nightlight for your room.
- Power it with a battery
- Make the project portable using a 9V battery or power bank (if using a USB-based Arduino board).


What to do next?
Integrate your remote control with the rest of your project ideas. Need a project idea?
Try making a Remote Control Car or a Robotic Arm

Become a member

Become a member
Become a subscriber
Become a sponsor

